



HyperSim: A Holistic Sim-To-Real Framework For Robust Robotic Manipulation
더 현실적인 시뮬레이션 + 더 다양한 recovery trajectory + 소량 real data co-training → zero-shot/few-shot sim-to-real 성능 향상
Robot foundation model을 만들기 위해서는 대규모 action-observation trajectory가 필요하지만 real-world robot data는 너무 비싸고, 기존 synthetic data는 real-world의 clutter와 dynamic uncertainty 등의 여러 변수들을 충분하게 반영하지 못한다는 문제가 있었다. 이 논문의 저자들은 기존 synthetic data pipeline이 1) simulation environment들이 oversimplified되었고, 2) trajectory가 heuristic scene configuration과 homogeneous, successful-only 위주로만 구성되어 있어서 diversity가 제한되며, 3) real-world와의 visual and dynamic mismatch가 있다는 문제점을 아직 해결하지 못했다고 주장한다.
이를 해결하기 위해 HyperSim은 3D Gaussian Splatting 기반 high-fidelity environment synthesis, bottleneck pose에서의 adversarial perturbation-recovery trajectory 생성, sim-and-real co-training을 하나의 pipeline으로 묶는다. 즉 이 논문은 synthetic data generation부터 policy training, real-world deployment까지 연결하는 holistic sim-to-real framework를 제안한다.
Introduction
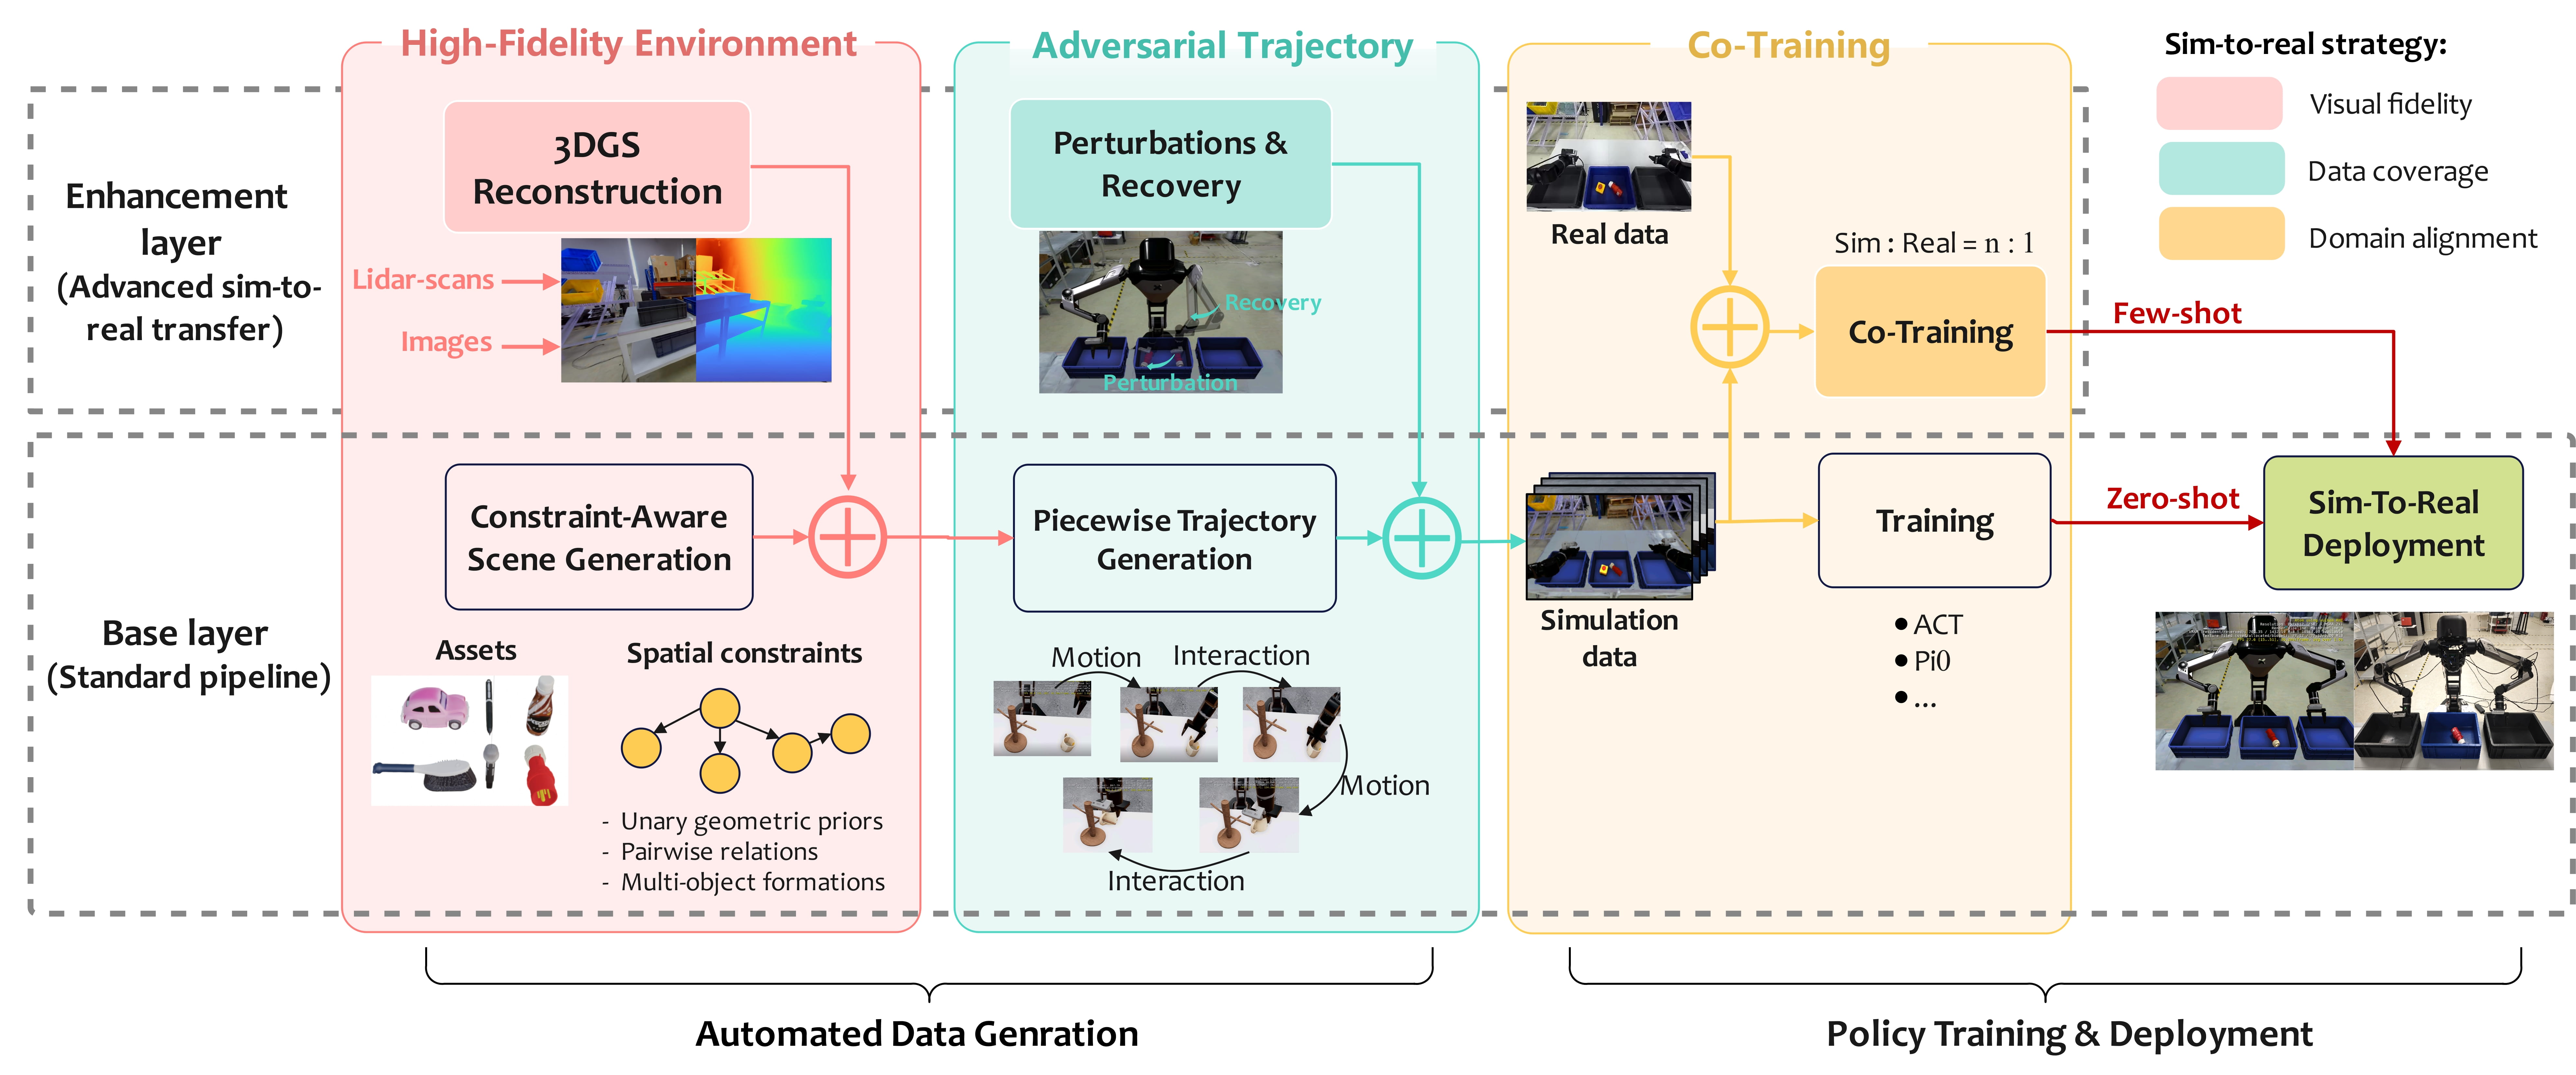 Overall Figure
이 논문은 sim2real gap을 세 개의 축으로 나눠서 다룬다:
| Gap | HyperSim의 해결책 |
|---|---|
| Visual fidelity gap | 3DGS 기반 high-fidelity background reconstruction |
| State-action coverage gap | bottleneck pose에서 adversarial perturbation 후 recovery trajectory 생성 |
| Domain representation gap | simulation data와 real data를 함께 쓰는 co-training |
즉, HyperSim의 접근법은 시뮬레이션만 많이 만드는 것이 아니라, “현실적인 observation을 만들고, 다양한 failure / recovery 상태들을 만들고, 마지막으로 소량의 real data로 representation을 align한다”이다. 논문은 이 구조를 base layer와 enhancement layer로 나눈다. base layer는 standard data-to-policy pipeline이고, enhancement layer는 high-fidelity environment, adversarial trajectory, co-training을 추가해 sim-to-real transfer를 강화한다.
Preliminary: 3DGS and collision
3D Gaussian Splatting은 scene을 수많은 3D Gaussian primitive로 표현하고, 이를 화면에 projection해서 photorealistic하게 rendering하는 방식이다. 각 Gaussian primitive가 position, covariance, opacity, spherical harmonics coefficient를 가진다. 이로 인해 RGB view synthesis는 매우 좋아지지만, 로봇 manipulation에서는 rendering만 좋아서는 부족하다. Contact과 collision이 중요하다.
그래서 HyperSim은 3DGS를 그대로 physics backend로 쓰지 않는다. 대신 다음과 같은 과정을 사용한다:
- 3DGS로 photorealistic rendering을 만든다.
- rendered color/depth map을 TSDF(Truncated Signed Distance Field, 3D 공간을 voxel 단위로 나누고, 각 voxel에서 가장 가까운 surface까지의 거리를 부호(+/-)와 함께 저장하여 실시간으로 정밀한 3D 지도를 생성하는 알고리즘)로 fuse한다.
- Gaussian representation과 구조적으로 정렬된 colorized mesh를 만든다.
- rendering은 Gaussian splats가 담당하고, collision/contact는 aligned mesh가 담당한다.
즉 3DGS와 Mesh를 결합해 visual fidelity와 physical interactivity를 동시에 확보한다.
Preliminary: Bottleneck pose
Manipulation task를 보면 보통 다음과 같은 두 단계로 이루어져 있다:
- Approach: gripper가 target object 근처까지 이동한다.
- Interaction: 실제로 grasp, push, place 같은 물리 접촉을 수행한다.
논문은 TCP(Tool Center Point, 로봇 끝에 장착된 end effector의 실제 작업 기준점이자 끝점)가 target object 주변의 작은 반구 영역 안으로 들어오는 순간을 bottleneck pose로 정의한다. 이 pose는 “아직 contact 직전이지만, 이제 interaction이 시작되기 직전의 중요한 상태”이다. 이 pose 전까지는 motion planning으로 비교적 쉽게 이동할 수 있고, 이 pose 이후에는 contact-rich interaction이라 policy가 실제 task competence를 보여야 하기 때문에 중요하다. 즉, bottleneck pose는 trajectory를 motion primitive와 interaction primitive로 나누는 경계이다. 이 pose에서 object를 perturb하면 policy가 recovery behavior를 배울 수 있다.
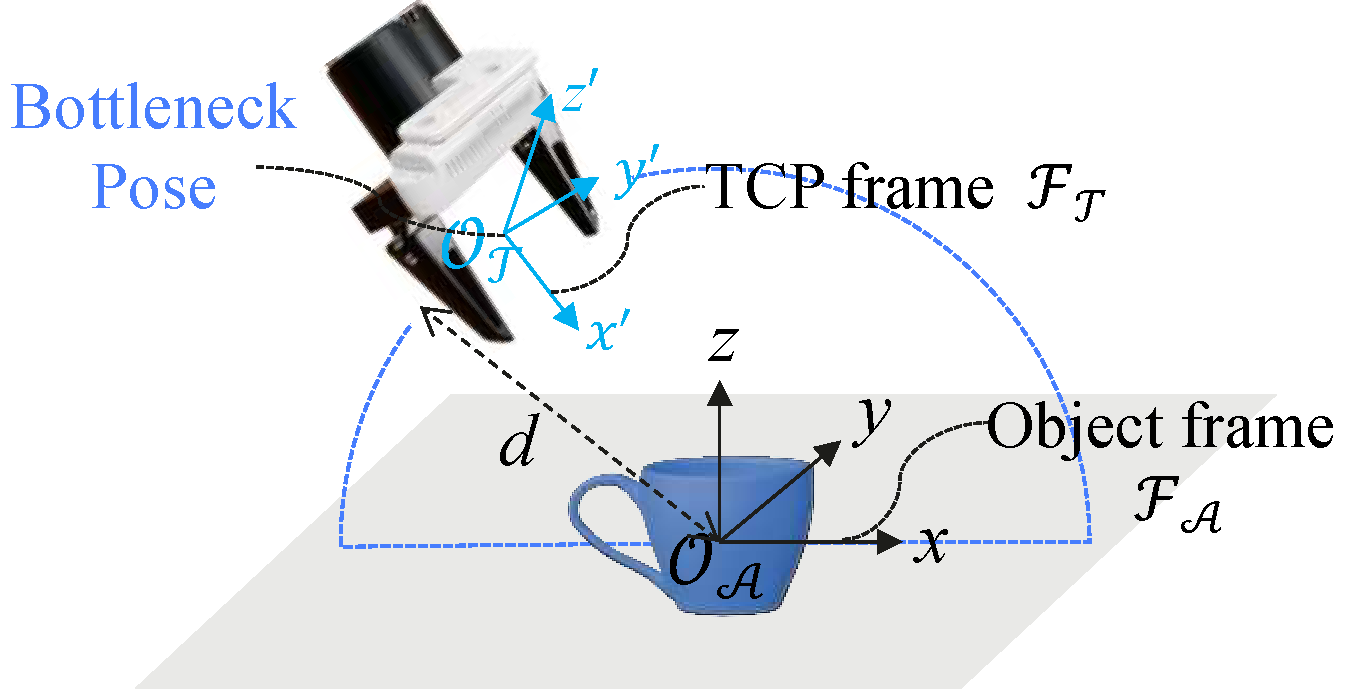 Bottleneck Pose
Method
위에서 설명한 것과 같이, HyperSim은 크게 세 모듈로 구성된다:
Human Data Collection
    ├── one-time environment scan
    └── small set of real demonstrations
        ↓
High-Fidelity Environment
    ├── 3DGS reconstruction for background
    └── constraint-aware scene generation for foreground
        ↓
Simulation Data Generation
    ├── BaseSim
    ├── ADSim
    └── 3DGS-ADSim
        ↓
Policy Training
    ├── zero-shot: simulation-only
    └── few-shot: sim-and-real co-training
        ↓
Real-world Deployment
High-Fidelity Environment
HyperSim의 scene은 아래와 같이 두 부분으로 나뉜다:
| 구성 요소 | 역할 |
|---|---|
| Foreground manipulation area | 로봇이 실제로 물체를 집고 놓는 상호작용 영역 |
| Surrounding background | 카메라에 보이는 주변 환경, 시각적 현실감 제공 |
Foreground는 물리 상호작용이 중요하므로 precise spatial constraints와 collision 가능한 3D assets가 필요하다. Background는 직접 상호작용하지 않지만, 카메라 관측에 큰 영향을 주므로 photorealistic reconstruction이 필요하다. HyperSim은 foreground는 constraint-aware generator로 만들고, background는 geometry-aware 3DGS로 재구성한다.
Foreground: constraint-aware scene generation
Foreground는 단순 random placement가 아니라 spatial relation constraints로 생성된다. 논문은 spatial relation constraint solver들을 크게 세 그룹으로 나눈다:
| 그룹 | 예시 | 의미 |
|---|---|---|
| Unary geometric priors | scale, pose2D, pose3D | object 자체의 크기와 pose 범위 constraint |
| Explicit pairwise relations | place_on_surface, place_to_left, place_behind 등 | 두 object 사이의 위치 관계 constraint |
| Implicit multi-object formations | random_placement, no_overlapping, with_obstacles | 여러 object를 한 공간에 배치할 때의 포괄적인 constraint |
Spatial Relation Constraints For Foreground Generation
| Category | Name | Description |
|---|---|---|
| Unary geometric prior | scale(OBJ, RANGE) | Scale OBJ within the RANGE. |
| Unary geometric prior | pose2D(OBJ, RANGE) | Randomize the 2D pose of OBJ within the RANGE. |
| Unary geometric prior | pose3D(OBJ, RANGE) | Randomize the 3D pose of OBJ within the RANGE. |
| Explicit pairwise relation | place_on_surface(OBJ, REF) | Place OBJ on top of REF. |
| Explicit pairwise relation | place_left_edge(OBJ, REF) | Place OBJ near the left edge of REF. |
| Explicit pairwise relation | place_right_edge(OBJ, REF) | Place OBJ near the right edge of REF. |
| Explicit pairwise relation | place_top_edge(OBJ, REF) | Place OBJ near the top edge of REF. |
| Explicit pairwise relation | place_bottom_edge(OBJ, REF) | Place OBJ near the bottom edge of REF. |
| Explicit pairwise relation | place_to_left(OBJ, REF) | Place OBJ to the left of REF. |
| Explicit pairwise relation | place_to_right(OBJ, REF) | Place OBJ to the right of REF. |
| Explicit pairwise relation | place_in_front(OBJ, REF) | Place OBJ in front of REF. |
| Explicit pairwise relation | place_behind(OBJ, REF) | Place OBJ behind REF. |
| Explicit pairwise relation | place_front_left(OBJ, REF) | Place OBJ to the front-left of REF. |
| Explicit pairwise relation | place_front_right(OBJ, REF) | Place OBJ to the front-right of REF. |
| Explicit pairwise relation | place_back_left(OBJ, REF) | Place OBJ to the back-left of REF. |
| Explicit pairwise relation | place_back_right(OBJ, REF) | Place OBJ to the back-right of REF. |
| Implicit multi-object formation | random_placement(OBJs, REF) | Place multiple OBJs randomly inside REF. |
| Implicit multi-object formation | no_overlapping(OBJs, REF) | Place multiple non-overlapping OBJs inside REF. |
| Implicit multi-object formation | with_obstacles(OBJ, OBS, REF) | Place OBJ with OBS inside REF. |
Background: geometry-aware 3DGS reconstruction
Background는 RGB, LiDAR, IMU를 동기화해서 수집하고, GPGS를 사용해 Gaussian primitive set으로 재구성한다. HyperSim은 Gaussian splat으로 RGB/depth를 만들고, TSDF fusion을 통해 Gaussian과 정렬된 mesh를 만든다. 이렇게 하면 다음과 같은 gain이 있다:
- 카메라 이미지는 3DGS가 현실적으로 만든다.
- collision/contact dynamics는 mesh가 담당한다.
- rendering과 physical geometry가 서로 정렬된다.
Adversarial Trajectory Generation
gripper가 bottleneck pose에 도달했을 때 target object를 갑자기 perturb하고, 새로운 bottleneck pose로 recovery trajectory를 다시 생성한다
Piecewise trajectory
각 manipulation subtask는 다음 두 primitive로 쪼개진다:
| Primitive | 의미 |
|---|---|
| Approaching primitive | initial state에서 bottleneck pose까지 이동 |
| Interaction primitive | bottleneck pose 이후 object와 접촉하며 조작 |
Perturbation and recovery
bottleneck pose에 도달하면 target state에 translation/rotation perturbation을 넣는다. 그러면 기존 trajectory는 더 이상 맞지 않으므로 motion planner가 새로운 bottleneck pose를 향해 recovery trajectory를 계산해야 한다. 이 perturbation-recovery cycle이 두 가지 효과를 가진다:
- target state distribution의 spatial coverage를 넓힌다.
- wrist camera 같은 exteroceptive sensor가 다양한 viewpoint를 관측하게 만든다.
Sim-and-Real Co-Training
- simulation data는 대량으로 생성한다.
- real data는 10개, 20개, 35개처럼 소량만 사용한다.
- policy training 시 simulation sample과 real sample을 일정 비율로 섞는다.
위 과정을 통해 visual/contact dynamics의 domain gap을 줄인다. 논문에서는 co-training objective를 다음과 같이 쓴다:
\[\mathcal{L}_{D^\alpha} = \alpha \mathcal{L}_{D_s} + (1-\alpha)\mathcal{L}_{D_r}\]여기서 $\alpha=1$이면 simulation-only training, 즉 zero-shot deployment이고, $\alpha<1$이면 일부 real data를 섞는 few-shot co-training이다.
Experiments
실험은 Galaxea R1 humanoid robot의 deep-bin sorting task에서 진행된다. 로봇은 head-mounted RGB camera와 wrist-mounted RGB camera에서 10 Hz로 visual observation을 받고, 중앙 deep bin에 있는 target object를 양 옆 bin 중 하나로 옮겨야 한다. Deep bin 환경은 flat-surface manipulation보다 bin wall collision, unstable grasp, corner case가 많기 때문에 sim-to-real robustness를 평가하기 좋은 setting이다.
평가는 ACT와 π0 두 policy를 대상으로 진행되며, 다양한 target pose와 visual distractor를 포함한 20개의 fixed real-world trial set을 사용한다. Metric은 아래 세 가지이다:
| Metric | Meaning |
|---|---|
| TAR | Target Alignment Rate. End-effector가 target의 bottleneck pose까지 정확히 도달한 비율 |
| SR1 | First-Attempt Success Rate. retry 없이 한 번에 성공한 비율 |
| SR3 | Overall Success Rate. 최대 3번 attempt 안에 성공한 비율 |
Zero-shot sim-to-real
Zero-shot 설정에서는 real demonstration 없이 simulation data만으로 policy를 fine-tuning한 뒤 real robot에 바로 deploy한다. 결과적으로 BaseSim → ADSim → 3DGS-ADSim으로 갈수록 성능이 꾸준히 좋아진다. 이는 adversarial trajectory가 target pose coverage와 recovery behavior를 늘리고, 3DGS rendering이 visual domain gap을 줄이기 때문이다.
| Training Data | Policy | TAR | SR1 | SR3 |
|---|---|---|---|---|
| BaseSim | ACT | 10% | 5% | 5% |
| ADSim | ACT | 45% | 10% | 15% |
| 3DGS-ADSim | ACT | 55% | 20% | 25% |
| BaseSim | π0 | 45% | 45% | 55% |
| ADSim | π0 | 75% | 60% | 70% |
| 3DGS-ADSim | π0 | 80% | 60% | 75% |
특히 π0는 3DGS-ADSim만으로도 SR3 75%를 달성한다. 즉, high-quality synthetic data와 pretrained foundation model의 prior가 결합되면 real data 없이도 꽤 강한 zero-shot sim-to-real transfer가 가능하다.
Few-shot co-training
Few-shot 설정에서는 35개의 real-world human demonstration을 simulation data와 함께 co-training한다. 이때 full HyperSim setting에 해당하는 Real35&3DGS-ADSim은 ACT에서 SR3 80%, π0에서 SR3 95%를 달성한다.
| Training Data | Policy | TAR | SR1 | SR3 |
|---|---|---|---|---|
| Real35 | ACT | 70% | 45% | 60% |
| Real35&3DGS-ADSim | ACT | 85% | 65% | 80% |
| Real35 | π0 | 85% | 70% | 70% |
| Real35&3DGS-ADSim | π0 | 95% | 75% | 95% |
중요한 점은 real data만 사용하는 것보다, real data와 high-quality synthetic data를 함께 쓰는 co-training이 더 좋은 성능을 보인다는 것이다. 즉, synthetic data는 단순히 real data를 대체하는 것이 아니라, limited real demonstrations의 coverage를 보완하는 역할을 한다.
Dynamic robustness
논문은 dynamic perturbation 상황도 평가한다. 이 실험에서는 online inference 중 사람이 target object의 state를 갑자기 바꾸고, policy가 이에 얼마나 잘 recover하는지를 측정한다.
| Training Data | Policy | TAR | SR1 |
|---|---|---|---|
| Real35&BaseSim | π0 | 30% | 25% |
| Real35&ADSim | π0 | 80% | 60% |
| Real35&3DGS-ADSim | π0 | 80% | 60% |
Adversarial trajectory를 사용하지 않은 Real35&BaseSim은 SR1이 25%에 그치지만, ADSim을 포함하면 SR1이 60%까지 올라간다. 이는 bottleneck pose에서 perturbation-recovery trajectory를 학습한 policy가 실제 deployment 중 발생하는 object displacement에도 더 잘 대응한다는 것을 보여준다.
Takeaway
실험 결과를 요약하면, HyperSim의 성능 향상은 단순히 synthetic data를 많이 만든 결과가 아니다. 3DGS 기반 visual fidelity, adversarial trajectory 기반 state-action coverage, real demonstration 기반 domain alignment가 함께 작동할 때 zero-shot/few-shot sim-to-real 성능이 크게 오른다. 특히 π0 기준으로 zero-shot에서는 SR3 75%, few-shot co-training에서는 SR3 95%를 달성한다.
Limitations
Single task suite
실험은 deep-container manipulation 중심이다. 다른 manipulation task, 예를 들어 articulated object manipulation, deformable object manipulation, long-horizon mobile manipulation에서도 같은 효과가 나는지는 아직 충분히 검증되지 않았다.
Single humanoid embodiment
Galaxea R1 하나의 embodiment에서 검증했다. 다른 로봇 팔, mobile manipulator, bimanual system, dexterous hand로 확장했을 때도 동일한 pipeline이 잘 작동하는지는 추가 검증이 필요하다.
Physical evaluation cost
논문에서는 collision-prone deep-container manipulation과 physical evaluation cost 때문에 실험 범위가 제한되었다고 설명한다.
Pipeline complexity
HyperSim은 실용적으로 강력하지만, environment scan, GPGS reconstruction, TSDF mesh fusion, constraint scene generation, adversarial trajectory generation, co-training까지 포함한다. 따라서 “간단한 방법”이라기보다는 full-stack data engine에 가깝다.
구체적인 co-training ratio와 scaling law는 제한적임
논문은 $\alpha$로 co-training ratio를 정의하지만, 다양한 $\alpha$ sweep이나 simulation data 규모에 따른 scaling law 분석은 핵심 실험으로 깊게 다루지 않는다. 이 부분은 후속 연구 포인트다.